
Configurar ACD para las integraciones de Apple Messages for Business
- Licencia Genesys Cloud CX 2, Genesys Cloud CX 3, Genesys Cloud CX 4, Genesys Cloud CX 2 Digital, Genesys Cloud CX 3 Digital o Genesys Cloud CX 1 Digital Add-on II
- Los siguientes permisos:
- Mensajería > appleIntegration > Añadir y Editar
- Mensajería > Integración > Ver y Borrar
Como administrador, puede utilizar la mensajería de Genesys Cloud ACD para permitir que sus clientes utilicen Apple Messages for Business (AMB) para enviar mensajes directos. Puede configurar Mensajes de Apple realizando los siguientes pasos.
Para obtener más información sobre la configuración desde Apple, consulte Onboarding with Apple Messages for Business.
- Navegue hasta la página Create Your Apple Account.
- Introduzca los datos necesarios para su cuenta. Para obtener más información sobre la creación de la cuenta, consulte Soporte de Apple.
Antes de configurar la mensajería ACD para AMB, debe tener una cuenta Apple para su empresa.
- Sólo puede tener una cuenta comercial AMB para su empresa. Comience con una cuenta de prueba cuando construya su experiencia en Genesys Cloud. Cuando esté listo para poner en marcha AMB en Genesys Cloud, cree una nueva cuenta de Commercial Messages for Business para utilizarla en la producción.
- Si va a trasladar su cuenta AMB desde otro proveedor, en el momento de la puesta en marcha se programará una hora con Apple para trasladar su cuenta de producción a Genesys Cloud.
- Si ya tienes una cuenta de empresa de Apple, ve al paso 3.
Para configurar su cuenta Apple de prueba, siga estos pasos:
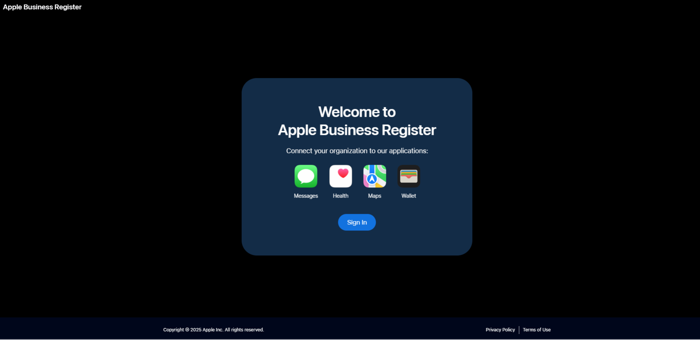
- Navegue hasta la página Apple Business Register. Haga clic en la imagen para ampliarla.

- Haga clic en Iniciar sesión. Utilice las credenciales de la cuenta de Apple que creó en el paso 1. Si aún no tiene una cuenta de Apple creada, vaya al Paso 1 y complete los pasos indicados. Una vez hecho esto, vuelva aquí para continuar.
- Aceptar las condiciones indicadas.
- Rellene la información requerida en los campos disponibles.
- Hacer clic Enviar.
A continuación, registre su cuenta empresarial Apple de prueba para conectarse a Genesys Cloud como proveedor de servicios de mensajería (MSP).
Para registrarse en una cuenta AMB, siga estos pasos:
- Navegue hasta la página Apple Messages for Business Registration y sinicie sesión con su cuenta de empresa de Apple. Se abre la página Mensajes para cuentas de empresa.
- Haga clic en Añadir nuevo.
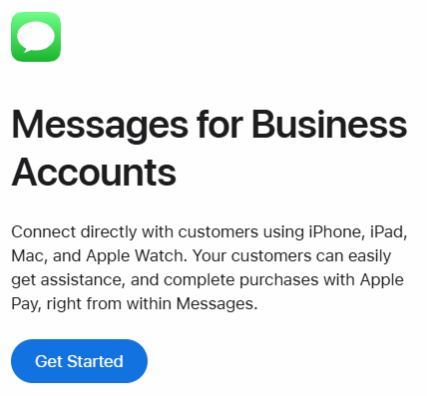
- En la página Mensajes para cuentas de empresa, haga clic en Get Started. Aparecerá la página Nuevos mensajes para cuenta de empresa.
Haga clic en la imagen para ampliarla.
- Siga los pasos y proporcione la información hasta llegar a la sección Mensajes para el tipo de cuenta empresarial.
- En la sección Mensajes para el tipo de cuenta empresarial, haga clic en Avanzado y seleccione su cuenta de prueba interna.
- Haga clic en Siguiente. Nota: Pasarás a una cuenta comercial después de probar la cuenta y de que Apple apruebe el diseño de tu canal para hacerlo público.
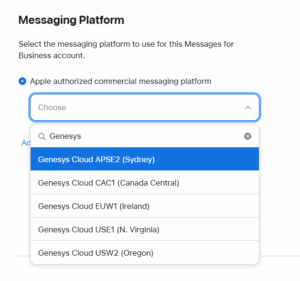
- Siga los pasos hasta llegar a la sección Messaging Platform. Para vincular su cuenta a Genesys como MSP, realice los siguientes pasos:
- Si la región de su organización es Sydney (APSE2), Canadá (CAC1), Irlanda (EUW1), Virginia del Norte (USE1) u Oregón (USW2), introduzca Genesys en la búsqueda y seleccione la región correcta de la lista.
-
Si su organización es de cualquier otra región, haga clic en Avanzado.
-
En la sección Avanzado, seleccione la opción URL proporcionada por la plataforma de mensajería.
-
Introduzca la URL necesaria de entre las opciones enumeradas en la siguiente tabla que corresponda a su región de organización de Genesys Cloud. Opción URL proporcionada por la plataforma de mensajería.
Región de Genesys Cloud Nombre de la región AWS MSP URL Asia Pacific – Mumbai ap-south-1 (APS1) https://apple-messages.aps1.pure.cloud/api/v2/apple Asia Pacific – Osaka ap-noreste-3 (APNE3) https://apple-messages.apne3.pure.cloud/api/v2/apple Asia Pacífico - Seúl ap-noreste -2 (APNE2) https://apple-messages.apne2.pure.cloud/api/v2/apple Asia Pacific – Sydney ap-sureste-2 (APSE2) https://apple-messages.mypurecloud.com.au/api/v2/apple Asia Pacific – Tokyo ap-noreste-1 (APNE1) https://apple-messages.mypurecloud.jp/api/v2/apple Canadá ca-central-1 (CAC1) https://apple-messages.cac1.pure.cloud/api/v2/apple Europa - Francfort eu-central-1 (EUC1) https://apple-messages.mypurecloud.de/api/v2/apple Europa - Irlanda eu-west-1 (EUW1) https://apple-messages.mypurecloud.ie/api/v2/apple Europa - Londres eu-west-2 (EUW2) https://apple-messages.euw2.pure.cloud/api/v2/apple Europa - Zúrich eu-central-2 (EUC2 ) https://apple-messages.euc2.pure.cloud/api/v2/apple Oriente Medio - EAU me-central-1 (MEC1) https://apple-messages.mec1.pure.cloud/api/v2/apple South America – São Paulo sa-east-1 (SAE1) https://apple-messages.sae1.pure.cloud/api/v2/apple Este de EE.UU. - Norte de Virginia us-east-1 (USE1) https://apple-messages.mypurecloud.com/api/v2/apple Oeste de EE.UU. - Oregón us-west-2 (USW2) https://apple-messages.usw2.pure.cloud/api/v2/apple
-
- Haga clic en Siguiente. Nota: Si no ve el botón Siguiente en estado activo, póngase en contacto con el equipo de soporte de Apple para obtener más ayuda. Realice los siguientes pasos:
- Seleccione temporalmente otra plataforma de mensajería comercial autorizada por Apple y envíe un correo electrónico al soporte de Apple con Configuración personalizada de puntos finales MSP en el asunto.
- En el cuerpo del correo electrónico, incluya la siguiente información: Al intentar configurar Apple Messages for Business con mi proveedor de servicios de mensajería y seleccionar la opción de URL personalizada para mi MSP, no puedo seleccionar el botón Siguiente para continuar después de introducir la URL. ¿Puede asociar la siguiente URL personalizada a mi cuenta?
- Incluya el nombre de la cuenta de prueba interna que intenta registrar. Por ejemplo, Prueba de la empresa ABC.
- Incluya la URL personalizada de la tabla anterior. Para obtener más información, consulte Get started with Apple Messages for Business.
- Una vez que Apple actualice el punto final MSP personalizado, vuelva a la página de registro de Mensajes de Apple para empresas.
- Haga clic en la cuenta de negocios y seleccione la opción y rellene los campos obligatorios y continuar con los pasos después de que siga. Haga clic en la imagen para ampliarla.

- Si la región de su organización es Sydney (APSE2), Canadá (CAC1), Irlanda (EUW1), Virginia del Norte (USE1) u Oregón (USW2), introduzca Genesys en la búsqueda y seleccione la región correcta de la lista.

- En la sección Tester Apple Accounts, añada las cuentas Apple de los usuarios de su organización. Estos usuarios pueden probar tu configuración AMB.
- Haga clic en Añadir cuentas de Apple.
- Aparece la sección IDs de Apple del probador. Haga clic en Añadir cuentas de Apple.
- Se abre el cuadro de diálogo Añadir cuentas Apple de comprobador. Introduzca los ID de cuenta de Apple de los probadores (incluya direcciones de correo electrónico o números de teléfono).
- Haga clic en Añadir. Siga adelante para completar la creación de su cuenta AMB. Para obtener más información sobre cómo añadir usuarios de prueba, consulte Añadir usuarios de prueba a su cuenta de Apple.
Una vez completados todos los pasos, el estado del perfil estará en revisión. Cuando Apple completa la revisión, el estado del perfil cambia a Activo. Haga clic en la imagen para ampliarla. 
- Antes de completar el siguiente paso, inicie sesión en la organización de Genesys Cloud (Dev, UAT o producción) donde desea vincular el canal AMB.
- Desde la página principal de su Cuenta Business, navegue hasta la sección Proveedor de Servicios de Mensajería y realice los siguientes pasos:
- En el campo Messaging Service Provider Configuration, haga clic en el enlace Test your Messaging Service Provider connection. Nota: Anote el ID de cuenta de Mensajes para empresas que aparece en esta página. Este ID se vincula en la configuración de Genesys Cloud Platform automáticamente.
- Aparece la pantalla Configuración del proveedor de servicios de mensajería. Haga clic en Conectar.
- Genesys Cloud navega a la página Plataformas de Genesys Cloud en Menú > Digital y Telefonía > Mensaje > Integraciones de Plataforma.Admin > Mensaje > Integraciones de Plataforma. Nota: Asegúrese de autenticarse en Genesys Cloud para mostrar la página de plataformas de Genesys Cloud.
- En el campo Messaging Service Provider Configuration, haga clic en el enlace Test your Messaging Service Provider connection.
- En la página Mensajes de Apple para empresas, actualiza los campos:
- En el campo Name, introduzca el nombre de la integración.
- En el campo Messages for Business ID, introduzca el ID de la empresa. Nota: No cambie el valor del ID de Mensajes para empresas, ya que este conecta su cuenta AMB con Genesys Cloud.
- (Opcional) En el campo Business Name, introduzca el nombre de la empresa.
- (Opcional) En el campo Logo URL, introduzca la URL.
- (Opcional) En el campo Perfil de contenido admitido, seleccione el perfil de contenido admitido. Para más información, consulte Resumen de perfiles de contenido compatibles.
- (Opcional) En el campo Platform Configuration, seleccione la configuración de la plataforma. Para obtener más información, consulte Descripción general de los perfiles de configuración de la plataforma.
- Haga clic en Guardar para terminar de crear la integración AMB en su organización.
Configure su integración AMB manualmente si Genesys Cloud no se abre automáticamente. Para crear la integración AMB manualmente, realice los siguientes pasos:
- Hacer clic Administración.
- En Mensaje, haga clic en Platform Integrations.
- Haga clic en Menú > Digital y telefonía > Mensaje > Integraciones de plataforma.
- Hacer clic Eliminar integración.
- En la página Plataformas de mensajería, haga clic en Apple Messages for Business.
- Ve al campo ID de Mensajes para empresas en la página Mensajes para empresas de Apple.
- En el campo Messages for Business ID, introduce el ID de empresa de tu cuenta de Apple Messaging for business. Para localizar el ID de la empresa, realice los siguientes pasos:
- Seleccione su Mensajes para empresas en la página principal.
- En la sección Proveedor de servicios de mensajería, seleccione el enlace Pruebe su conexión con el proveedor de servicios de mensajería.
- Aparecerá el ID de su cuenta de Mensajes para empresas. Pegue este ID en el campo Messages for Business ID.
- Introduzca los datos en los campos opcionales y haga clic en Guardar.
Después de configurar la integración de Apple, puede configurar los flujos de mensajes en Architect. Para más información, consulte Visión general de los flujos de mensajes entrantes. Puedes probar tu AMB utilizando dos métodos:
- Haz clic en el enlace del test conversacional desde un iPhone o iPad.
- Haz clic en el enlace desde tu Mac. Nota: Sólo puedes realizar pruebas de mensajería en las cuentas Apple que hayas especificado como cuentas Apple de prueba. Para añadir más cuentas de Apple para probar, vaya a la sección Cuentas de Apple de los probadores, seleccione Editar y, a continuación, añada o elimine cuentas de Apple para probar.
Para probar su cuenta AMB, realice los siguientes pasos:
- Vaya a la sección Enlaces.
- Para realizar la prueba desde un iPhone o iPad, sigue estos pasos:
- Seleccione Copiar enlace conversacional desde su iPhone o iPad.
- Comparta el enlace con sus probadores. Los testers pueden acceder a este enlace desde sus dispositivos iPhone o iPad para abrir la app de mensajes en su dispositivo y empezar a comunicarse para empezar a probar su cuenta de Apple Messages for Business.
- Para probarlo desde su Mac, haga clic en el enlace Launch Messages y comparta el enlace con sus probadores.
- Para realizar la prueba desde un iPhone o iPad, sigue estos pasos:
- Los probadores utilizan los enlaces para probar su flujo AMB.
Utilice la sección Autenticación (opcional) para configurar los ajustes de OAuth2 para sus flujos AMB.
- Esta sección es opcional cuando se configura la cuenta AMB. Aunque rellene un campo de esta sección, los tres campos se convierten automáticamente en obligatorios.
- Antes de continuar, asegúrese de conocer los detalles de la región de Genesys Cloud que utiliza su organización. Para obtener más información sobre las regiones de Genesys Cloud y determinar la región que utiliza su organización, consulte Regiones de AWS para Genesys Cloud.
Para configurar la autenticación, siga estos pasos:
- Seleccione un proveedor OAuth. Asegúrese de que el proveedor ofrece OAuth 2.0.
- En la página de configuración del proveedor de autenticación, el sistema le pide que introduzca una URL de redirección. En función de la región en la que esté desplegada su organización, seleccione la URL de redirección adecuada en la siguiente tabla:
Región de Genesys Cloud Nombre de la región AWS MSP URL Asia Pacific – Mumbai ap-south-1 (APS1) https://api.aps1.pure.cloud/api/v2/conversations/messaging/
oauth/apple/callbackAsia Pacific – Osaka ap-noreste-3 (APNE3) https://api apne3.pure.cloud/api/v2/conversations/messaging/
oauth/apple/callbackAsia Pacífico - Seúl ap-noreste -2 (APNE2) https://api.apne2.pure.cloud/api/v2/conversations/messaging/
oauth/apple/callbackAsia Pacific – Sydney ap-sureste-2 (APSE2) https://api.mypurecloud.com.au/api/v2/conversations/messaging/
oauth/apple/callbackAsia Pacific – Tokyo ap-noreste-1 (APNE1) https://api.mypurecloud.jp/api/v2/conversations/messaging/
oauth/apple/callbackCanadá ca-central-1 (CAC1) https://api.cac1.pure.cloud/api/v2/conversations/messaging/
oauth/apple/callbackEuropa - Francfort eu-central-1 (EUC1) https://api.mypurecloud.de/api/v2/conversations/messaging/
oauth/apple/callbackEuropa - Irlanda eu-west-1 (EUW1) https://api.mypurecloud.ie/api/v2/conversations/messaging/
oauth/apple/callbackEuropa - Londres eu-west-2 (EUW2) https://api.euw2.pure.clouddomain}/api/v2/conversations/messaging/
oauth/apple/callbackEuropa - Zúrich eu-central-2 (EUC2 ) https://api.euc2.pure.cloud/api/v2/conversations/messaging/
oauth/apple/callbackOriente Medio - EAU me-central-1 (MEC1) https://api.mec1.pure.cloud/api/v2/conversations/messaging/
oauth/apple/callbackSouth America – São Paulo sa-east-1 (SAE1) https://api.sae1.pure.cloud/api/v2/conversations/messaging/
oauth/apple/callbackEste de EE.UU. - Norte de Virginia us-east-1 (USE1) https://api.mypurecloud.com/api/v2/conversations/messaging/
oauth/apple/callbackOeste de EE.UU. - Oregón us-west-2 (USW2) https://api.usw2.pure.cloud/api/v2/conversations/messaging/
oauth/apple/callback - Obtenga los siguientes datos de la configuración del proveedor de autenticación; son necesarios para completar la configuración:
- Secreto de cliente: Este valor se enterpreta en Genesys Cloud en la integración de Apple en un paso posterior.
- URL OAuth: Este valor se introduce en en la configuración del AMB en un paso posterior.
-
- Token URL: Este valor se introduce en la configuración de AMB y en Genesys Cloud en la integración de Apple en un paso posterior.
- ID de cliente: Este valor es introducido en la configuración de AMB y en Genesys Cloud en la integración de Apple en un paso posterior.
- Alcance: Teste valor se selecciona como parte de la configuración de autenticación con el proveedor de autenticación y se introduce en Genesys Cloud en la integración de Apple en un paso posterior. Nota: La autenticación AMB se centra en OAuth 2.0 y no en OIDC. Por lo tanto, openid no es compatible actualmente.
-
- En la página de configuración del proveedor de autenticación, el sistema le pide que introduzca una URL de redirección. En función de la región en la que esté desplegada su organización, seleccione la URL de redirección adecuada en la siguiente tabla:
- Vaya a Apple Business Register para configurar la cuenta de empresa de Apple y establecer su configuración OAuth2.
- Seleccione la cuenta AMB que desea configurar con Autenticación.
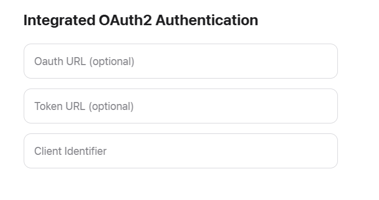
- Localice la sección Autenticación OAuth2 integrada y haga clic en Editar. Haga clic en la imagen para ampliarla.
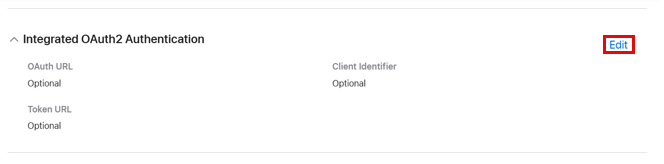
- En el campo OAuth URL, introduzca la URL del proveedor del Paso 1.
- En el campo Token URL, introduzca los detalles de la URL del proveedor del Paso 1.
- En el campo Client ID, introduzca los datos de identificación del cliente del proveedor del paso 1. Haga clic en la imagen para ampliarla.
- Hacer clic Enviar.
- Navegue a la integración de Genesys Cloud Apple en Genesys Cloud para terminar de configurar la Autenticación desde Genesys Cloud.
- Hacer clic Administración.
- En Mensaje, haga clic en Plataformas.
- Haga clic en Menú > Digital y telefonía > Mensaje > Integraciones de plataforma.
- Seleccione la integración de Apple correspondiente a la cuenta AMB configurada en el paso 2.
- Active la autenticación (Opcional) toggle. Se muestran los campos adicionales.
- En el campo OAuth Token URL, entre los detalles de la URL del proveedor del Paso 1.
- En el campo OAuth Client ID, introduzca los detalles del ID de cliente del proveedor del Paso 1.
- En el campo OAuth Client Secret, introduce los detalles del ID de cliente del proveedor del Paso 1.
- En el campo Scope, introduzca el alcance del proveedor del Paso 1.
- Añade la acción autenticar al flujo del bot digital donde se necesite autenticación. Para obtener más información, consulte Acción Solicitar autenticación.


Utilice la sección Aplicación iMessage (Opcional) para configurar los ajustes de la aplicación iMessage para los flujos del bot AMB.
- Esta sección es opcional cuando se configura la cuenta AMB. Aunque rellene un campo de esta sección, los tres campos se convierten automáticamente en obligatorios.
- Genesys Cloud admite una aplicación iMessage por integración AMB.
- La configuración del AMB para los administradores de la organización es opcional.
- Activar iMessage App (Opcional) alternar. Se muestran los campos adicionales.
- En el campo Nombre de la aplicación, entre el nombre de la aplicación iMessage.
- En el campo Application ID, entre el identificador único de la aplicación.
- En el campo Bundle ID, entre el ID del paquete de la aplicación.
- Redirigir a una página con mensajería web,
- Un número al que llamar, o
- Un número para enviar SMS como método de comunicación alternativo.
-
En Apple Business Register, vaya a Cuenta de Mensajes para empresas > Integraciones opcionales > Dispositivos no compatibles > Editar.

- En el cuadro Redirect Page URL, introduzca la URL de redirección a la que deben redirigirse los dispositivos que no sean Apple.
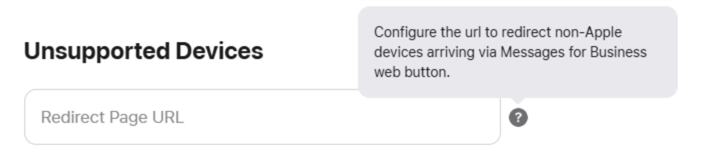
- Hacer clic Enviar.
Utilice la sección Apple Pay (Opcional) para configurar una cuenta de comerciante para transmitir mensajes de Apple Pay a sus clientes.
- Antes de configurar Apple Pay en Genesys Cloud, complete los siguientes pasos en el sitio web de Apple.
- Configura tu cuenta de comerciante en el sitio web de Apple.
- Asocie el dominio de su sitio web a su cuenta de comerciante.
- Cree y descargue certificados para su cuenta de comerciante.
- Genere el archivo PEM para su cuenta de comerciante. Para más información, consulte prerequisite configuration with Apple.
- Registre el ID de comerciante en el registro de empresas de Apple. Para registrarse, siga estos pasos:
- En Apple Business Register, navegue hasta su cuenta Messages for Business > Integraciones opcionales > Apple Pay > Editar.
- En la página Editar, introduzca el ID de comerciante de Apple Pay de .
- Vaya a la página de integraciones de Genesys Cloud Platform. Para más información, consulte Paso 5.
- Active la opción Apple Pay (Opcional) . Se muestran los campos adicionales.
- En el campo Store Name, introduzca el nombre de la tienda del cliente. Este campo tiene un límite de 64 caracteres.
- En el campo Merchant ID, introduzca el número de identificación único del comerciante.
- En el campo Redes, introduzca las redes admitidas. Las redes compatibles que puedes seleccionar son:
- AMEX
- Descubra
- JCB
- MasterCard
- Marca blanca
- Visa
- En el campo Domain Name, introduzca la URL del sitio web de la marca sin utilizar signos de puntuación ni prefijos. Por ejemplo,
developer.apple.com. La URL que introduzca debe coincidir con el nombre de dominio de la cuenta de vendedor. - En el campo Capacidades, introduzca el conjunto de capacidades que admite el comerciante. Nota: Se requiere 3DS.
- En el campo Payment Gateway URL, introduzca el endpoint para el procesamiento de la pasarela de pago.
- En el campo URL de actualización del método de envío, introduzca la URL para actualizar el método de envío.
- En el campo URL de actualización del contacto de envío, introduzca la URL para actualizar el contacto de envío.
- En el campo URL de actualización del método de pago, introduzca la URL para actualizar el método de pago. Este campo es opcional para Apple Pay.
- En el campo URL de seguimiento de pedidos, introduzca la URL para actualizar el seguimiento de pedidos. Este campo es opcional para Apple Pay.
- En el campo Fallback URL, introduzca la URL que se utilizará para el fallback. Este campo es opcional para Apple Pay.
- En el campo Certificados de identificación del comerciante, cargue los certificados del comerciante. Estos certificados se crean cuando la marca se registra con Apple como comerciante. Utilice el botón Click to Upload para cargar los certificados. Los certificados pueden tener uno de los siguientes formatos:
merchant.pemmerchant.key
- Haga clic en Guardar. Una vez cargados y guardados, los certificados quedan ocultos.
Para pasar tu cuenta AMB a producción, debes presentar tu experiencia de marca en el canal AMB y enviarla a Apple para su aprobación. Planifique la presentación de su experiencia de marca al menos tres semanas antes de la puesta en marcha prevista, ya que este proceso requiere tiempo de revisión y ajustes para crear la mejor experiencia de marca. Para más información sobre el proceso de revisión de la experiencia, consulte Proceso de revisión de la experiencia.
Aproveche al máximo la experiencia utilizando las acciones multimedia disponibles en el canal AMB. Por ejemplo, utilice imágenes con sus selectores de listas y acciones de formularios.
Para superar la revisión de la experiencia de Apple, realiza los siguientes pasos:
- Cree una grabación de un caso de uso real con el flujo de prueba que ha creado con un iPhone o iPad de Apple. Nota: El caso de uso debe representar la experiencia final del usuario.
- Nombre la grabación como Genesys_BusinessName_Date.
- Sube tu grabación al sitio designado .
- Introduzca la dirección de correo electrónico y una descripción del caso de uso del vídeo, así como cualquier información pertinente. Nota: Apple envía cualquier comentario a la dirección de correo electrónico proporcionada, incluidas las mejoras de la experiencia solicitadas.
- Introduzca la dirección de correo electrónico y una descripción del caso de uso del vídeo, así como cualquier información pertinente.
- Apple revisa la grabación y proporciona comentarios junto con los ajustes necesarios.
- Realice los ajustes solicitados y vuelva a enviar la nueva grabación con la experiencia actualizada.
Una vez que Apple apruebe tu revisión de la experiencia, podrás pasar tu cuenta AMB a producción con una cuenta de Mensajes comerciales para empresas. Para más información, consulte el paso 10.
Antes de ponerte en marcha, crea tu cuenta comercial de Mensajes para empresas para tu marca. Hasta ahora se ha utilizado una cuenta de prueba interna. En este paso, cree los Mensajes comerciales para la Cuenta de empresa que se utilizarán en producción.
- Navegue hasta la página Apple Messages for Business Registration.
- Inicia sesión con tu cuenta de Apple.
- Se abre la página Mensaje para cuentas de empresa. Haga clic en Añadir nuevo.
- En la página Mensajes para cuentas de empresa, haga clic en Get Started.
- Aparecerá la página New Messages for Business Account. Siga los pasos y proporcione la información requerida hasta llegar a la sección Mensajes para el tipo de cuenta empresarial.
- En la sección Mensajes para el tipo de cuenta comercial, seleccione Comercial y cree su cuenta de producción.
- Siga los pasos indicados e incluya un logotipo para mostrarlo en su AMB.
- Introduzca toda la información requerida y envíela para su aprobación.
- Una vez aprobada, su cuenta AMB aparece como Online.
- Habilita tus puntos de entrada de Mensajes de Apple para empresas para que los clientes puedan empezar a interactuar con tu marca en Mensajes de Apple para empresas.
- Los puntos de entrada permiten a los clientes iniciar conversaciones con su empresa. Para obtener más información sobre los puntos de entrada, consulte Visión general de los puntos de entrada.