Crear políticas de acceso
Los siguientes permisos:
- Autorización > política > Todos los permisos
- Autorización > política > Añadir
- Autorización > política > Suprimir
- Autorización > política > Ver
El siguiente entorno de organización:
- Asegúrese de que ha activado la opción Enable Attribute Based Access Control para que su organización aplique las políticas de acceso a los usuarios.
Puede crear una nueva política de acceso desde cero utilizando la opción Create Policy o utilizar una plantilla de política prediseñada disponible diseñada por Genesys Cloud, editarla y guardarla como política.
Crear una política de acceso a partir de una plantilla predefinida
Para crear una política de acceso a partir de una plantilla de política existente, haga lo siguiente:
- Hacer clic Administración.
- En Personas y permisos, haga clic en Acceso Políticas.
- Haga clic en Menú > Gestión de usuarios > Políticas de acceso.
- Haga clic en Plantillas.
- Seleccione una plantilla existente. Actualmente, Genesys Cloud proporciona las siguientes plantillas de políticas de acceso para que pueda empezar:
- Haga clic en la plantilla de política basada en sus necesidades. Aparecen los detalles de la plantilla.
- Edite el nombre y la descripción de la política.
- Modifique los campos de dominio, entidad y acción si está especificando un objetivo diferente para la política.
- (Opcional) Permita que la política se active inmediatamente activando la opción Enable Policy. También puede activar una política más tarde editando la política. Para obtener más información, consulte Habilitar política de acceso.
- Modifique las secciones de asunto, efecto y condición en el JSON de la política, si es necesario, para satisfacer sus necesidades organizativas.Nota:
- Para obtener más información sobre los campos utilizados en Policy JSON, consulte la sección Definiciones utilizadas en ABAC.
- Para obtener más información sobre la lista de atributos predefinidos utilizada en Policy JSON, consulte Lista de valores de campos restringidos.
- Para obtener información detallada sobre los atributos de las políticas de acceso, consulte Control de acceso basado en atributos.
- Para validar la sintaxis JSON, haga clic en Validar sintaxis en la pestaña Validar sintaxis. Resuelva cualquier error sintáctico y proceda a guardar la política. En caso de que no valide la sintaxis explícitamente, Genesys Cloud la valida automáticamente al guardar la política. El paso de validación de sintaxis valida lo siguiente:
- Si los campos obligatorios están disponibles.
- Los atributos enumerados son válidos para el objetivo especificado.
- Todas las comparaciones de atributos son válidas para sus respectivos tipos de datos.
- Los nombres de atributos preestablecidos no entran en conflicto con los definidos en el sistema.
- Haga clic en Guardar como política.
- Para verificar si la política funciona como se espera, haga clic en la pestaña Política de prueba y proporcione datos de muestra y haga clic en Política de prueba.
- Para volver a la página de políticas, haga clic en Cancelar.
Ejemplos de plantillas prediseñadas
Actualmente, Genesys Cloud incluye las siguientes plantillas de políticas de acceso:
Puede modificar los parámetros de la plantilla en el JSON de la política: los campos de dominio, entidad y acción especifican el objetivo o grupo de llamadas a la API.
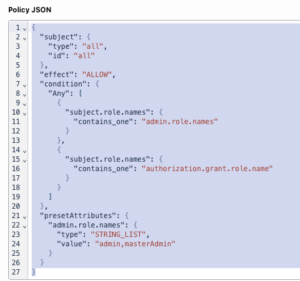
Esta plantilla tiene las dos condiciones siguientes:
Condición 1
"subject.role.names": {
"contains_one": "admin.role.names"
}
Esta condición comprueba si el sujeto tiene un rol de administrador. Si el sujeto tiene un rol de administrador, el resultado es Permitir.
Condición 2
"subject.role.names": {
"contains_one": "authorization.grant.role.name"
}
Si el sujeto no tiene un rol de administrador, la acción sólo se permite si el sujeto ya tiene el rol que está intentando otorgar. authorization.grant.role.name es un atributo que contiene el nombre del rol que el sujeto está intentando otorgar a sí mismo o a otro usuario. Así, por ejemplo, si el sujeto tiene un rol de supervisor pero no de administrador, el resultado es Denegar, si se intenta otorgar un rol de administrador. En este caso, el rol admin no está incluido en la lista de nombres de roles temáticos.
En esta plantilla, los atributos preestablecidos para admin.role.names pueden ser una lista que contenga los roles admin y masterAdmin. Si tienes otros roles de administrador personalizados en tu organización, puedes añadirlos a esta lista, separados por comas.

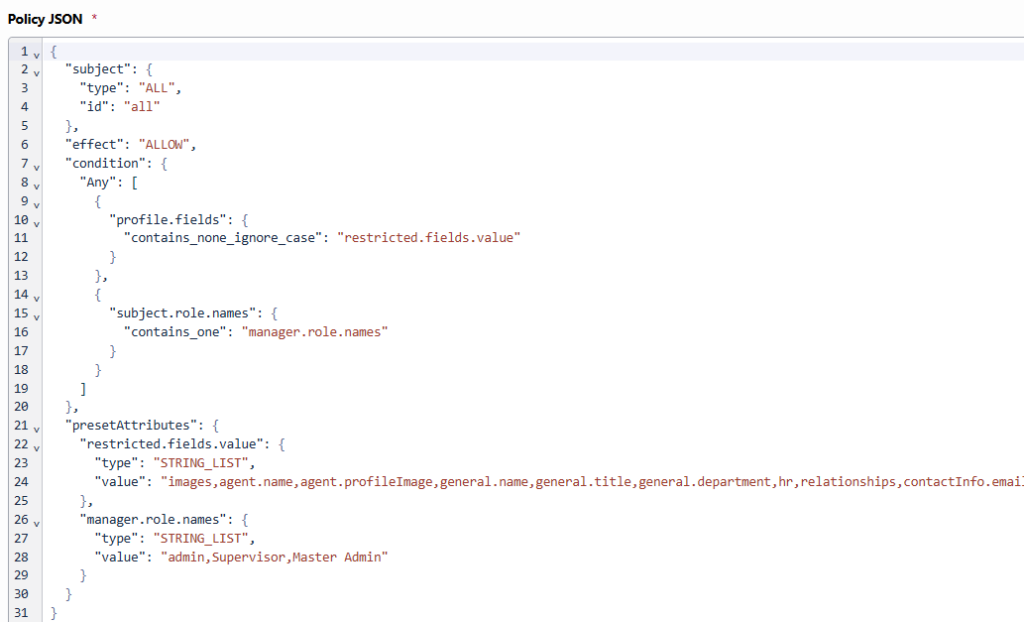
Esta plantilla contiene una regla Cualquiera, lo que significa que la política devuelve un resultado de Permitir si se cumple cualquiera de las condiciones especificadas. La plantilla tiene por defecto las dos condiciones siguientes.
Condición 1
"profile.fields": {
"contains_none_ignore_case": "restricted.fields.value"
Esta condición comprueba si el campo del perfil de usuario que se está modificando no está incluido en la lista de atributos preestablecidos de restricted.fields.value e ignora la distinción entre mayúsculas y minúsculas en la comparación. Si el campo que se está modificando no está en la lista, el resultado de esta condición es True. Puede editar la lista de atributos predefinidos como campos individuales o como nombre de sección o una combinación de ambos, según las necesidades de su entorno. Para obtener más información sobre los atributos predefinidos admitidos, consulte restricted fields value list.
Condición 2
"subject.role.names": {
"contains_one": "manager.role.names"
Esta condición comprueba si el sujeto tiene una función incluida en la lista de atributos preestablecidos de manager.role.names. Si el sujeto tiene alguno de estos roles, entonces la acción está permitida.
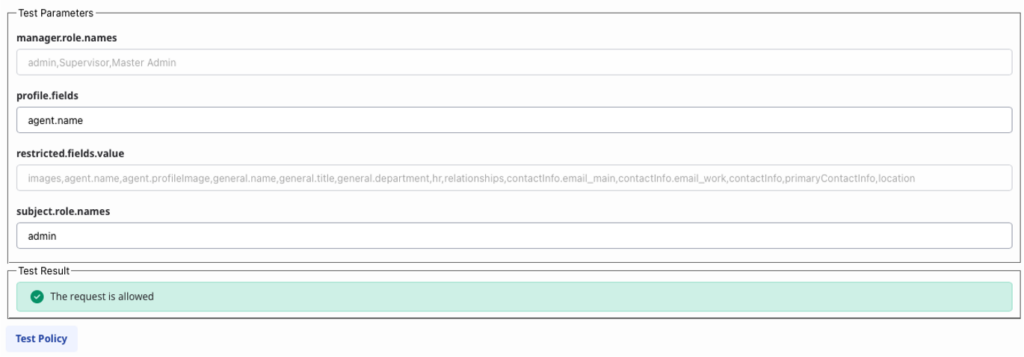
Una vez guardada la plantilla como política, puede probarla para confirmar que funciona como se espera. En la siguiente imagen de ejemplo, el sujeto tiene el rol de administrador por lo que la solicitud está permitida, aunque el campo de perfil (agent.name) está incluido en la lista de campos restringidos.

Crear una política de acceso mediante la función Crear política
Para crear una política de acceso desde cero, haga lo siguiente:
- Hacer clic Administración.
- En Personas y permisos, haga clic en Acceso Políticas.
- Haga clic en Menú > Gestión de usuarios > Políticas de acceso.
- Haga clic en Crear política.
- Introduzca el nombre y la descripción de la política.
- Especifique los campos de dominio, entidad y acción en función de los requisitos de su política. Puede consultar las plantillas prediseñadas para crear su propia política.
- (Opcional) Permita que la política se active inmediatamente activando la opción Enable Policy. Puede activar una política más tarde editando la política. Para obtener más información, consulte Habilitar política de acceso.
- Defina las secciones de asunto, efecto y condición en el JSON de la política en función de sus necesidades organizativas. Nota:
- Para obtener más información sobre los campos utilizados en Policy JSON, consulte la sección Definiciones utilizadas en ABAC .
- Para obtener más información sobre la lista de atributos predefinidos utilizada en Policy JSON, consulte Lista de valores de campos restringidos.
- Para obtener información detallada sobre los atributos de las políticas de acceso, consulte Control de acceso basado en atributos.
- Para validar la sintaxis JSON, haga clic en Validar sintaxis en la pestaña Validar sintaxis. Resuelva cualquier error sintáctico y proceda a guardar la política. En caso de que no valide la sintaxis explícitamente, Genesys Cloud la valida automáticamente al guardar la política. El paso de validación de sintaxis valida lo siguiente:
- Si los campos obligatorios están disponibles.
- Los atributos enumerados son válidos para el objetivo especificado.
- Todas las comparaciones de atributos son válidas para sus respectivos tipos de datos.
- Los nombres de atributos preestablecidos no entran en conflicto con los definidos en el sistema.
- Hacer clic Ahorrar.
- Para verificar si la política funciona como se espera, haga clic en la pestaña Política de prueba y proporcione datos de muestra y haga clic en Política de prueba.
- Para volver a la página de políticas, haga clic en Cancelar.


